
NEW cabinotch® Full Access Pilot Hole Feature
When we first started the discussion of what the cabinotch® Full Access Cabinet Library for KCD® would use as it’s primary construction method, Lamello has always been the primary focus. Now with a few months between national launch and now, we have found that one of our original thoughts has proven to be true (cabinetmakers are going to want to screw the cabinet together).
We all know that there are two aspects to assembly, first is the ability to locate the parts in the right place and orientation, and the Lamello Tenso P-14 is second to NONE in this aspect, but the second part of this equation is holding the cabinet together throughout the delivery and installation process, and in the words of that great prophet and sage, Buzz Lightyear, “to infinity and beyond”.
Lamello clearly defines the Tenso P-14 System as a clamp, not a fastener (although almost everyone, including yours truly refer to it often as a fastener). Lamello’s clear position is the clamp holds the parts in place until the glue dries, and depending on the glue you choose to use, the time required for that glue to set can vary greatly (from 2 hours up to multiple days), and as a cabinetmaker myself, I know that we seldom have days to let cabinets sit around waiting for glue to dry.
Another option is to simply use the Lamello clamps for position only, and use screws to attach the parts together (NO GLUE NEEDED). So now, after assisting multiple shops with the assembly and installation process, myself and our sales team have all found that more often than not, cabinetmakers are choosing to use screws. That has led us to push our decision to add 3mm pilot holes up to right now instead of at some point in the near future. What this looks like in reality is that all of what KCD® refers to as an unfinished end will have 3mm pilot holes pre-drilled so you can just run your screws. For clarification, what KCD® calls an unfinished end may in fact already be finished, or in the case of our material of choice, UV pre-finished, and what KCD® refers to as a finished end is in reality raw, and needs to be finished (one way to look at it is finished ends need to be finished, unfinished ends DO NOT need to be finished). The same line of reasoning works for finished and unfinished cabinet interiors as well.
So if you choose to use applied ends, All your cabinet sides will be pre-drilled with 3mm holes so you can screw your cabinets together. If you choose to utilize integral finished ends, we will not pre-drill with 3mm holes for the obvious reasons (since you never need to stress the joint by clamping a finished end to anything, it’s not needed anyway).
I’m sure every cabinetmaker knows from experience that not all screws are created equal, so with over 20 years of experience using screws to assemble cabinetry, I’m going to share my opinion with you on the best screw to use. After a lot of testing back in the mid 1990’s, we settled on a #6 self-tapping, self-countersinking screw from 1 1/2″ to 1 3/4″ in length. I personally used Hafele’s Zip-R screw, and still think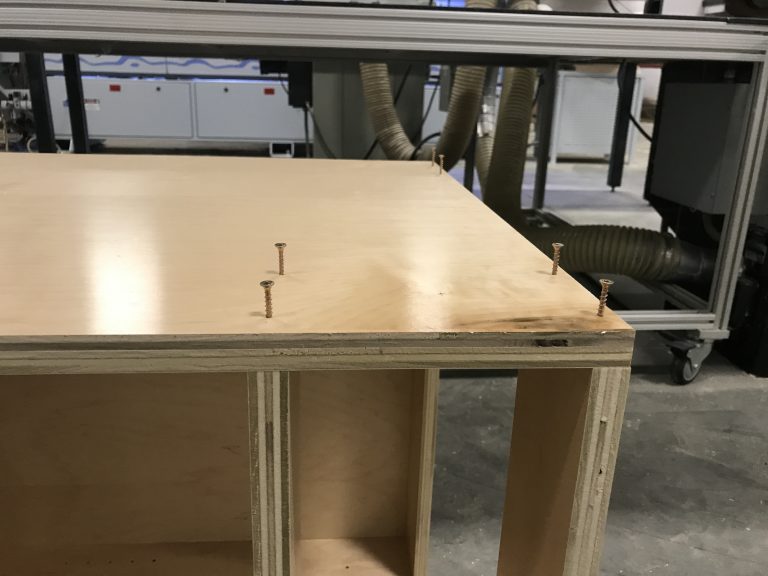 it is the best fastener for the money.
Some of you might be wondering why a #6 instead of a #8, to which I would respond, a #8 screw run as close as we need to run it from the edge (I’m skimming the Lamello already) will knife open your sheet stock. If you think a #6 screw might be a compromise on holding strength, it might, but in a test we ran a couple weeks ago, it exceeded the 600# 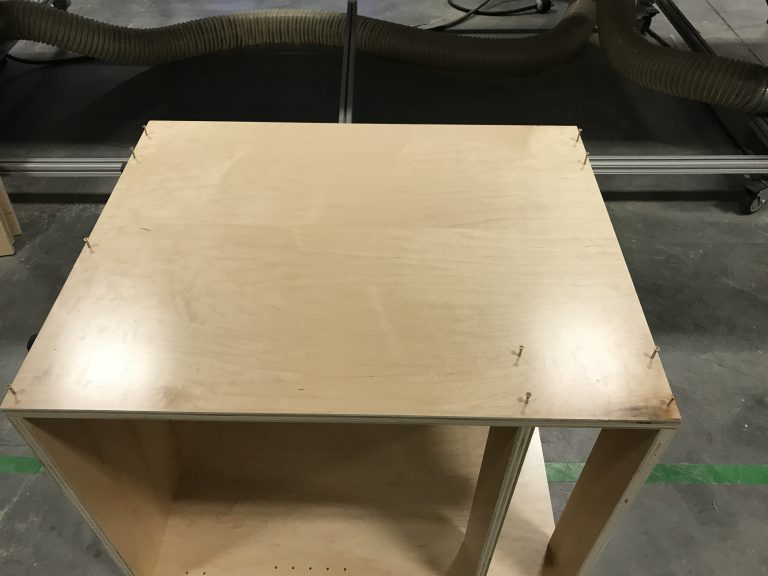 capacity of our test scale, so I doubt there is anything you are going to do to the cabinet that will require more holding power than the #6 screw provides.
So here is what an end panel will look like from this point on (I started the screws just so you could see the quantity and position you can expect to see for your cabinets). Is that applause I hear? You’re Welcome, and it’s our pleasure to hear what you are asking for, and to make it happen as quickly as possible.
Well that pretty well covers this topic, but feel free to ask any questions you might have below, and to make sure you won’t miss any of our cabinotch® posts, enter your email address in the Subscribe field on the right, and each time we add to this discussion, you will automatically be notified. Oh, and you won’t hurt our feelings if, depending on where you are seeing this, you Share, Like, Plus or Re-tweet it.
Why are the applied finished end panels not showing up on the quote/ order report.
My last Full Access cabinet order I received the applied end panels and finished back panels.
Thanks for the pilot holes and the Zip-R #6 screw recommendation!
Kent, we are pleased that you find the 3mm pilot holes useful. The “Disappearing Applied Ends” was a bug, and has since been fixed. The only issue now is that the fix is not retroactive, so any jobs drawn prior to the fix being pushed (approximately two weeks ago), will not be affected by the fix. To fix those projects, you will need to replace the existing applied ends with applied ends from the library (the applied ends in the library were corrected by the fix, applied ends in existing jobs could not be fixed at the job level, so will need to be replaced). Just delete the existing applied ends and replace them and you will be golden.
We apologize for any inconvenience this bug has caused anyone, and are working hard to crush bugs when we find them, but even more importantly, we are working even herder to prevent them from escaping into the wild.