
Full Access Frieze
One of the more frequent questions we get is in relation to the Frieze items listed in the Cabinotch Full Access library for KCD. Sometimes the question is “What is Frieze?”, others range from “Why would I use Frieze?”,or “How do I use Frieze?” to “How do I control the Frieze size?”.
What is Frieze?
To answer the first question, Frieze by definition is: A Frieze is a wide horizontal band with painted or sculpted decorations (often near the top of a wall and/or near the ceiling or over a doorway). The most famous Frieze can be found on the Parthenon which is located in Greece.
Expanding on the definition, Frieze can be made from hardwood or from engineered materials with a ply, MDF or particle core, with either no face, or veneer face. If you purchase your Frieze from Cabinotch, it will be machined from plywood and the strips will be edgebanded on the 2 long edges (more about purchasing Frieze from Cabinotch later).
Why would I use Frieze?
So let’s take a look at the second question, ‘Why would I use Frieze?’ Typically, the only reasons to use Frieze with Full Access cabinetry is that the cabinetry goes to the ceiling, forcing you to use face mount crown mold, or you just want to use face mount crown mold because you either can’t get an appropriate top mount crown, or you prefer face mount crown. Frieze provides a place to nail your face mount crown, much like the top rail of a face frame cabinet.
There are other ways of providing a flat area for face mount crown, like adding a Mounting Plate on top of the cabinets, and then a Frieze mounted to that Mounting Plate (which is a lot more work), or using buildup on top of the cabinet, (again, a lot more work). Plus, in both cases where you are adding something to the top of the cabinet, you lose usable cabinet height.
How do I use Frieze?
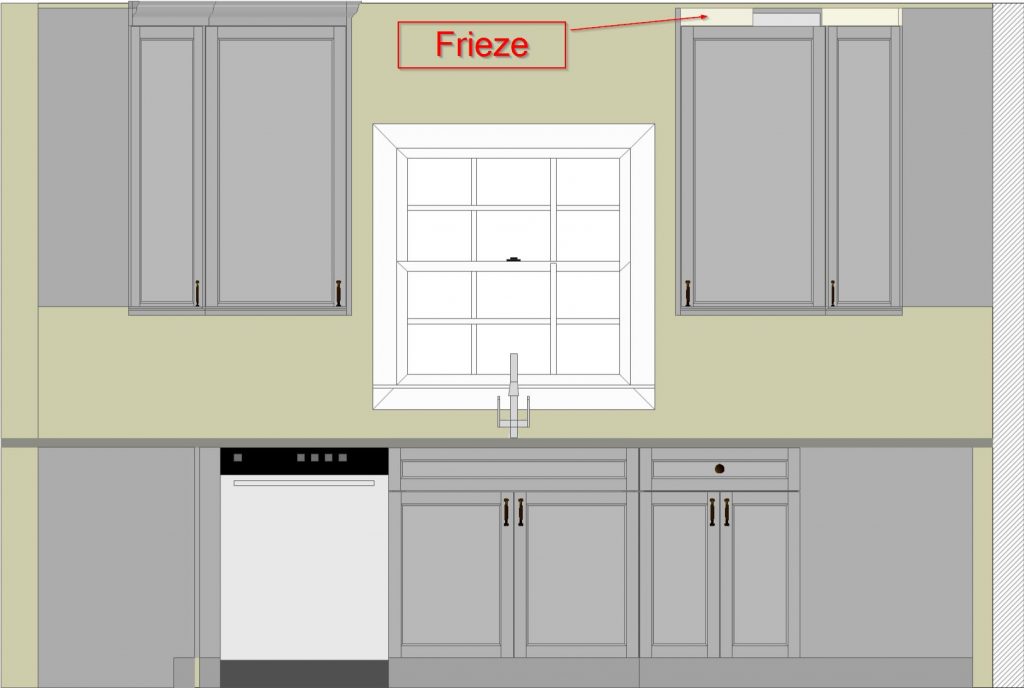
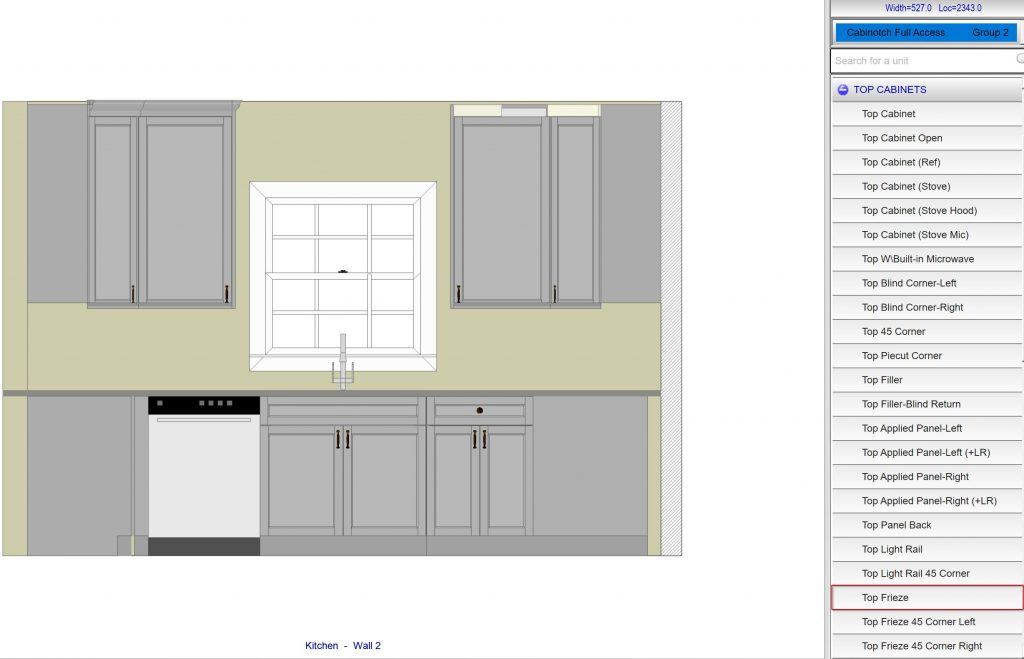
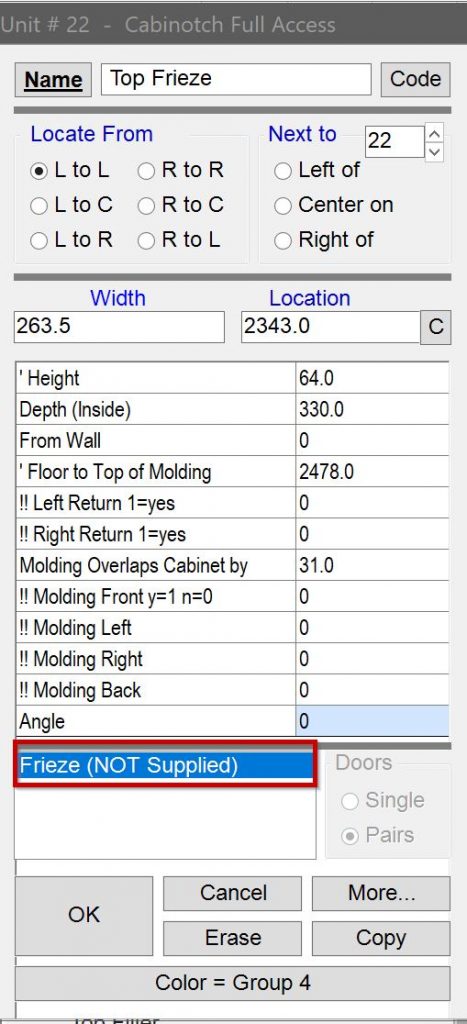
The ‘How do I use Frieze’ question is a little more complicated than just how it interfaces with your Cabinet and other cabinet components like Crown Mold and Applied Ends, thus it goes back to your design, and in our case, how does it work in the Cabinotch Full Access library of KCD. Below I have inserted an image that to the left of the Window shows the end result of a job drawn in KCD using Frieze. To the right of the window, I have removed the crown and changed the color of the Frieze on both cabinets to make it easier to distinguish the Frieze from the Cabinet, Crown and Applied Ends. I’ve also shortened the length of the Frieze on one of the cabinets so you can see the cabinet behind it.
How do I control the Frieze size?
How you control Frieze in KCD is fairly straightforward, but you do need to understand the relationship between the Top Reveal and Frieze as well as how it interfaces with Applied Ends. On a typical Full Access cabinet, our default Upper Cabinet Top Reveal is 3mm (1/8″), but when you are going to use Frieze you would set your Upper Cabinet Top Reveal to something much bigger than that to make room for the Frieze. All Reveals are controlled globally (for all cabinets in the job) in Shop Standards, and Locally (for a single cabinet) in the Cabinet Dialog box.
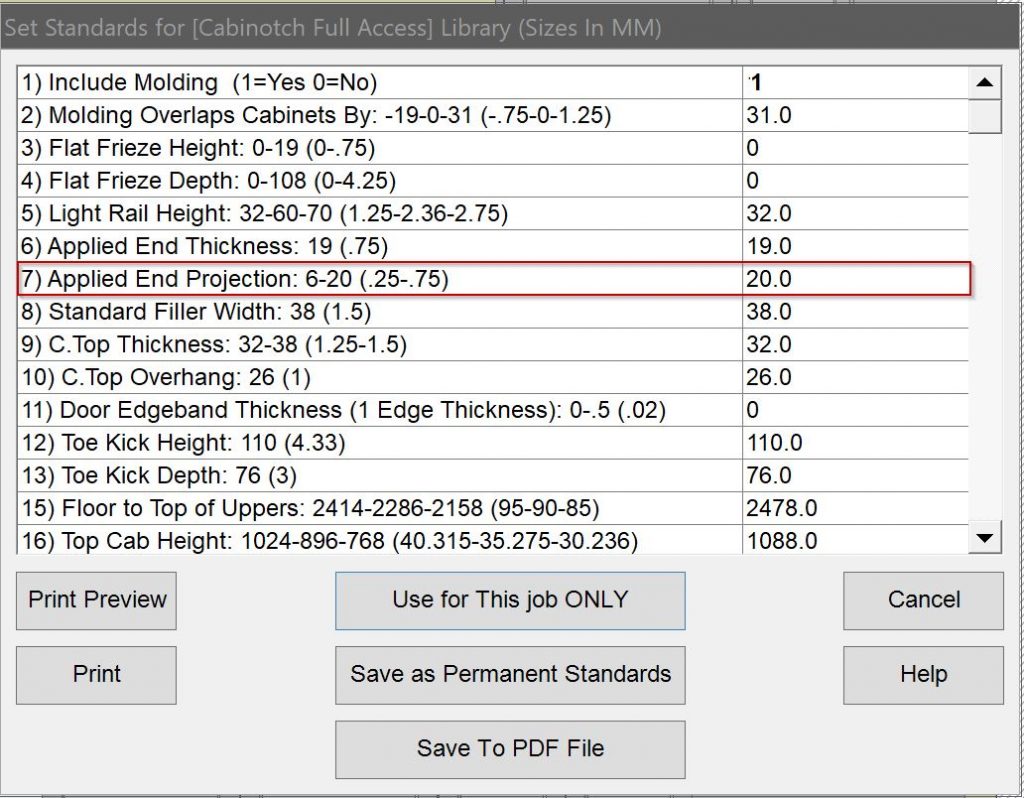
In KCD, from the File Menu at the top of the screen, if you choose Change > Set Shop Standards and scroll down to line 73, you will see that this line controls the Top Reveal, and that I have some suggested sizes, 3mm (.118″), 67mm (2.638″), and 99mm (3.898″) to the right of the description. You can set this to anything you want or need. The image above has the Top Reveal set to 67mm (2.638″), and the image below shows how that was set.
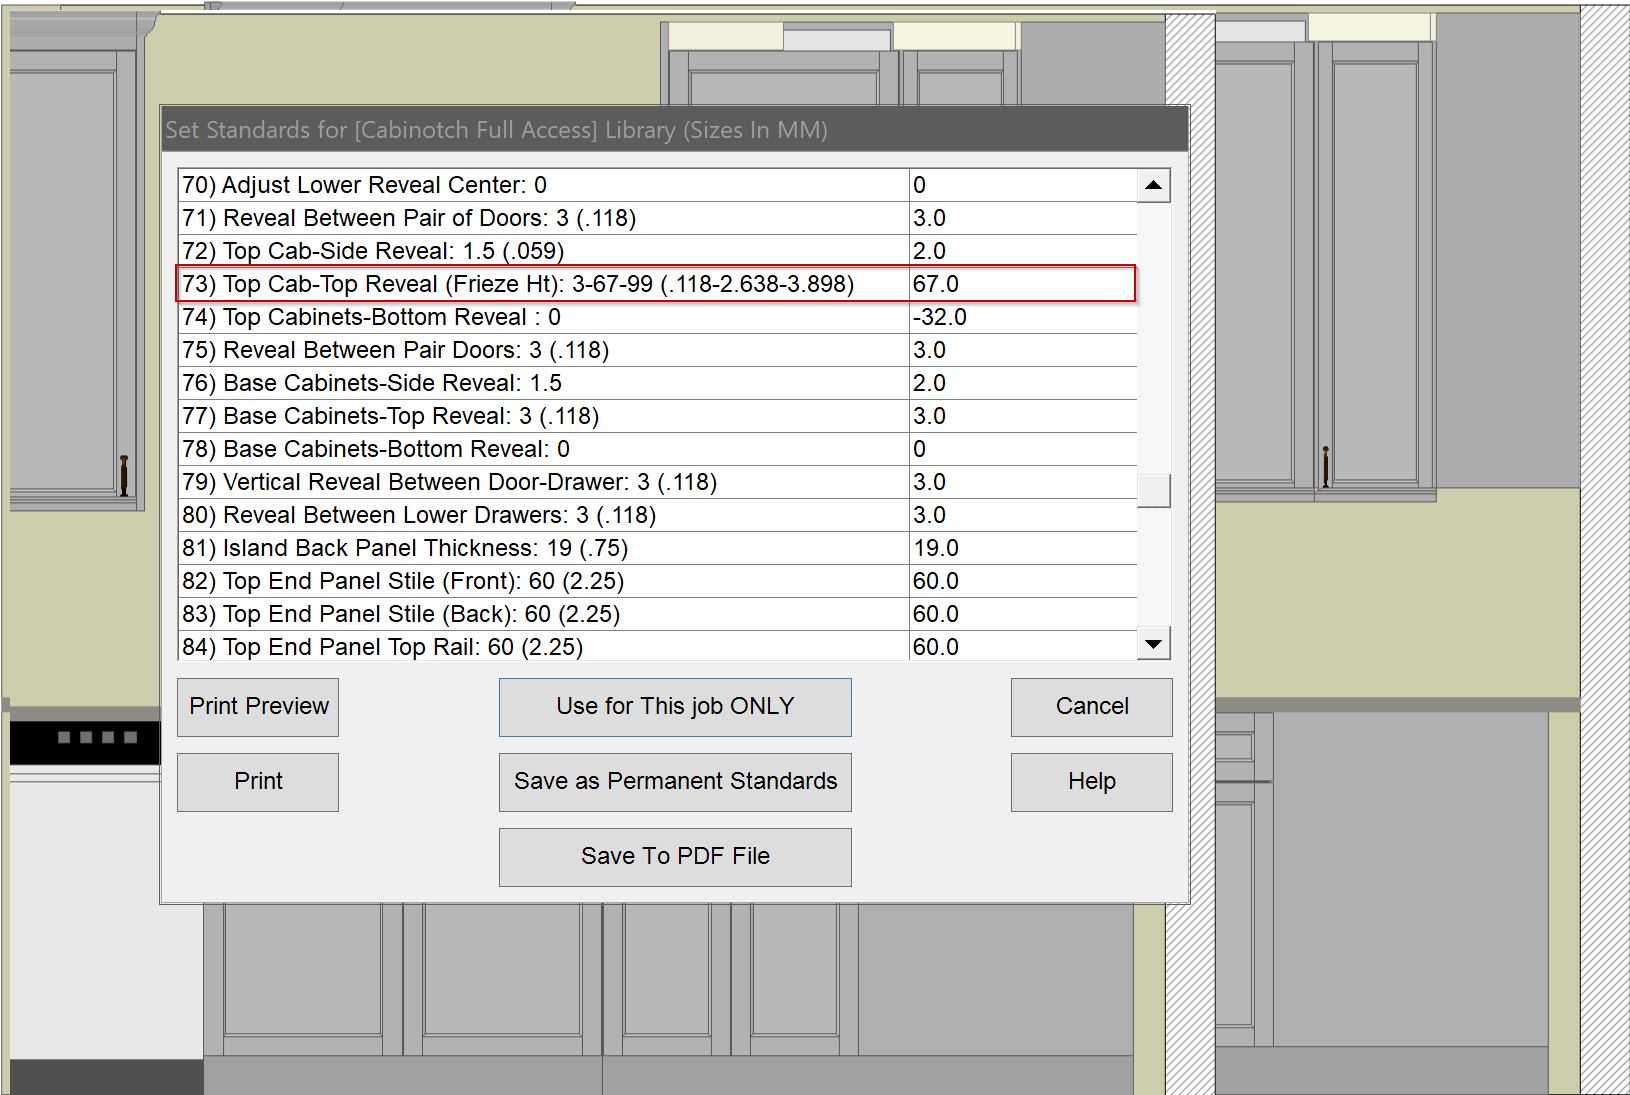
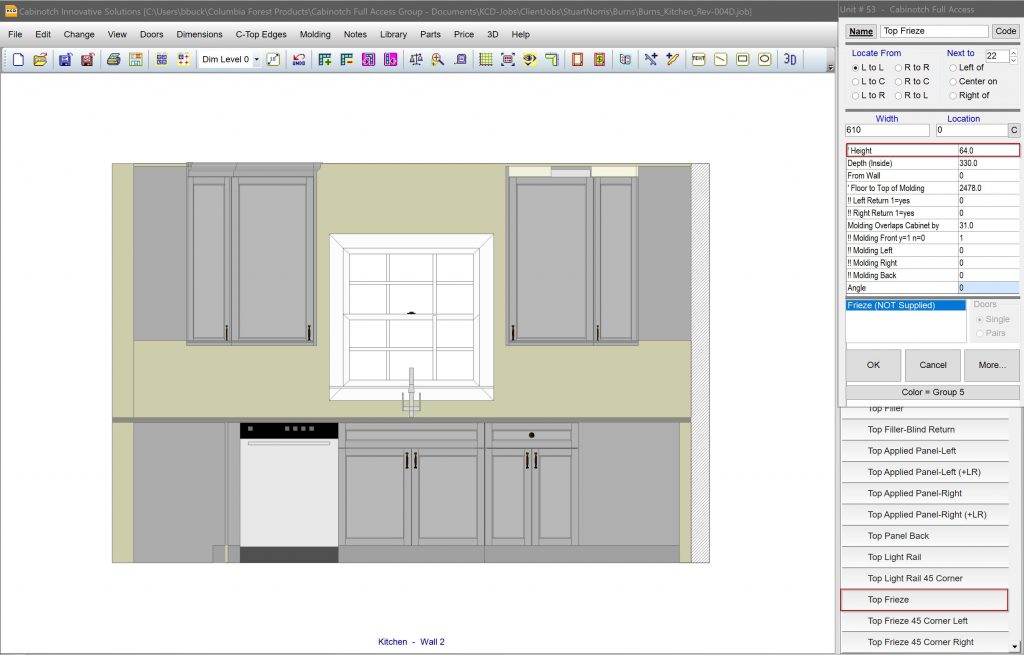
By using this field in the Shop Standards, I do several things, the most obvious being that your Top Reveal will be 67mm, leaving a 67mm space from the top of the door to the top of the cabinet, but this setting will also control the size of the Frieze. So if you select one of the Frieze options in the Menu List on the right of your KCD screen,
you will see that the default Height of your Frieze is 64mm (2.52″), so that is the 67mm – 3mm = 64mm, in other words, I automatically subtract the typical 3mm (1/8″) reveal from the height of the Frieze so we still have a 3mm (1/8″) reveal between the top of door and the bottom of the Frieze. This automatic adjustment works with all upper and tall cabinets.
You can adjust any of these dimensions, but the objective of using the Shop Standards before you start designing your project is that the defaults will be correct, and you won’t have to edit these dimensions for every piece of Frieze you add, or have to edit the Top Reveal for every Cabinet you add.
How do I purchase Frieze from Cabinotch?
Also, take note that the only option for Frieze in the dialog box is NOT Supplied, meaning Cabinotch does not supply this part if you add it to a design. The primary reason is that these parts are too small to effectively machine on a CNC Machine, but secondarily, it is better to have long lengths of this material to cut to size at installation.
If you want Cabinotch to supply material to cut your Frieze from, I suggest adding a room to the end of your job, or directly behind each Room if you have multiple rooms with differing wood species, and in these rooms, maybe name them, Kitchen Parts, or something similar that makes sense to you, add Tall Fillers that are twice the width of your Frieze plus enough extra to rip on a saw and have enough material for both pieces. If your total width is not at least 108mm (4.25″), then we are going to round up to that width so we can machine the strips without loosing parts on the CNC Router.
Since you are making the strips wide enough to get two pieces out of them, then the total linear footage can be 1/2 of what you need plus something factored in for waste. But, keep in mind this Frieze is nailed right to the top face of the cabinet, above the doors with a 3mm (1/8″) reveal between the Frieze and Doors, leaving nothing at the top of the cabinet for your doors to land on if the cabinet has a pair if doors. Having extra Frieze can solve this problem by simply adding a second piece cut to fit inside any cabinets that have a pair of doors, mounted directly behind the Frieze. This secondary piece is really more of a top rail than a Frieze, and is optional, but some cabinetmakers feel it is essential.
How does Frieze work at Finished Ends?
My personal opinion is Frieze looks best when used in conjunction with Applied Ends (as shown in the KCD images above and photos below), and those Applied Ends need to project past the face of the cabinet by the thickness of your Frieze. You control that in the Shop Standards as well, so open the Shop Standards and look at line 7. To make the front face of your applied end flush to your doors, you need to account for the door thickness, and the hold off of your hinge, so I typically keep this set to 20mm (13/16″), but you can set it to account for your situation (ideally your door and Frieze are very similar in thickness).
I have not found an extra 1mm (1/32″) positive variation here to be a problem (a negative projection will definitely be a problem, so avoid that). If your applied end is just a little proud of your Frieze, the face mount crown wrapping around this still looks fine. If the variation gets a little too excessive, you can scribe the face of the applied end where the face mount crown will rest with a sharp chisel.
If you choose to utilize Integral Finished Ends instead of Applied Ends, the Frieze will be mitered at all integral finished ends and returned to the wall, leaving the thickness of the Frieze proud of the finished end (still looks good).
Putting it all together
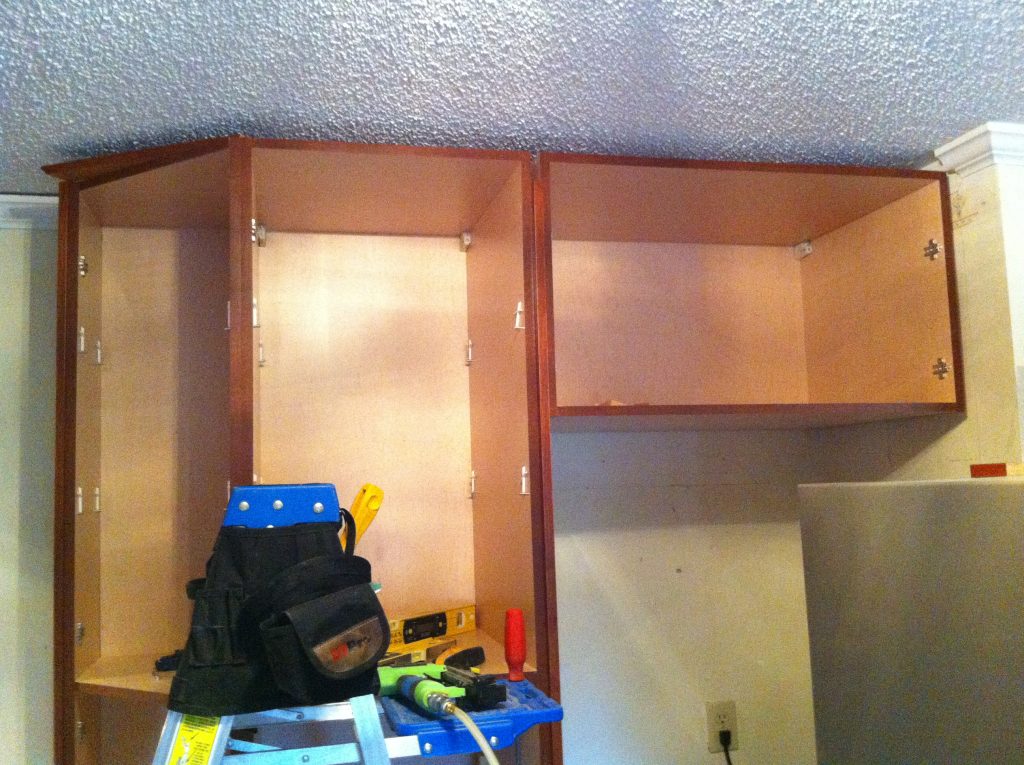
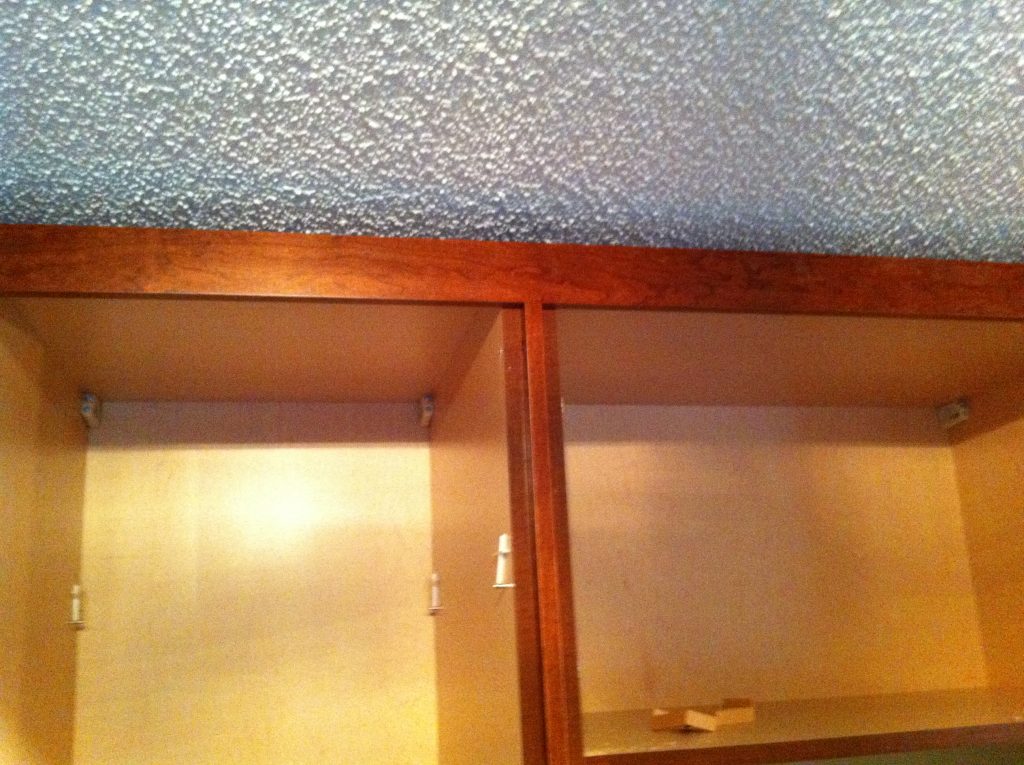
So here are a few photos of a job where the cabinets go to the ceiling. I typically try to hold the cabinets off the ceiling by at least 25.4mm (1″) when using a suspension system so I can get my cabinet up high enough to get it on the hanging/suspension rail (If I did not utilize a suspension system, which I personally would never do, I would still hold the cabinets down a similar amount in case the ceiling is not level). In other words, I find the lowest ceiling height point in the room by utilizing a digital measuring device and measuring all around the room, and call that my ceiling height, then subtract a dimension that will give me my minimum 25.4mm (1″) of clearance, then round that clearance up until my cabinet height is divisible by 32mm (the last part is only relevant if you want to stay in system), and that becomes my floor-to-ceiling dimension for the cabinetry.
This first image shows the cabinets installed, but the Frieze has not been nailed on yet.
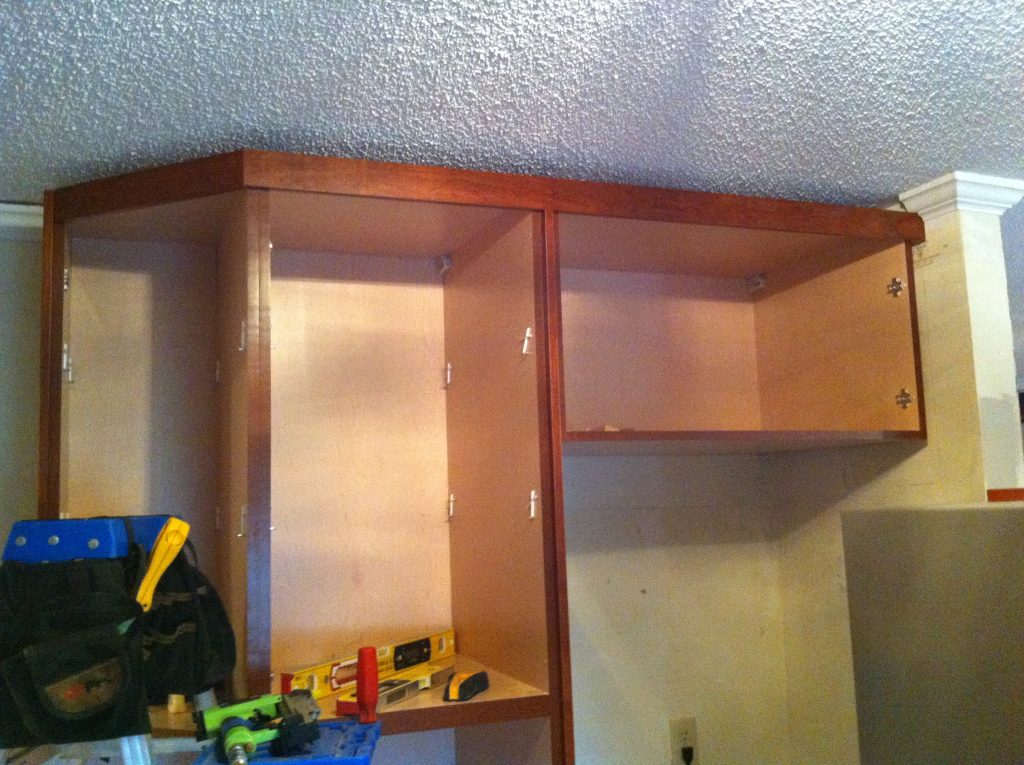
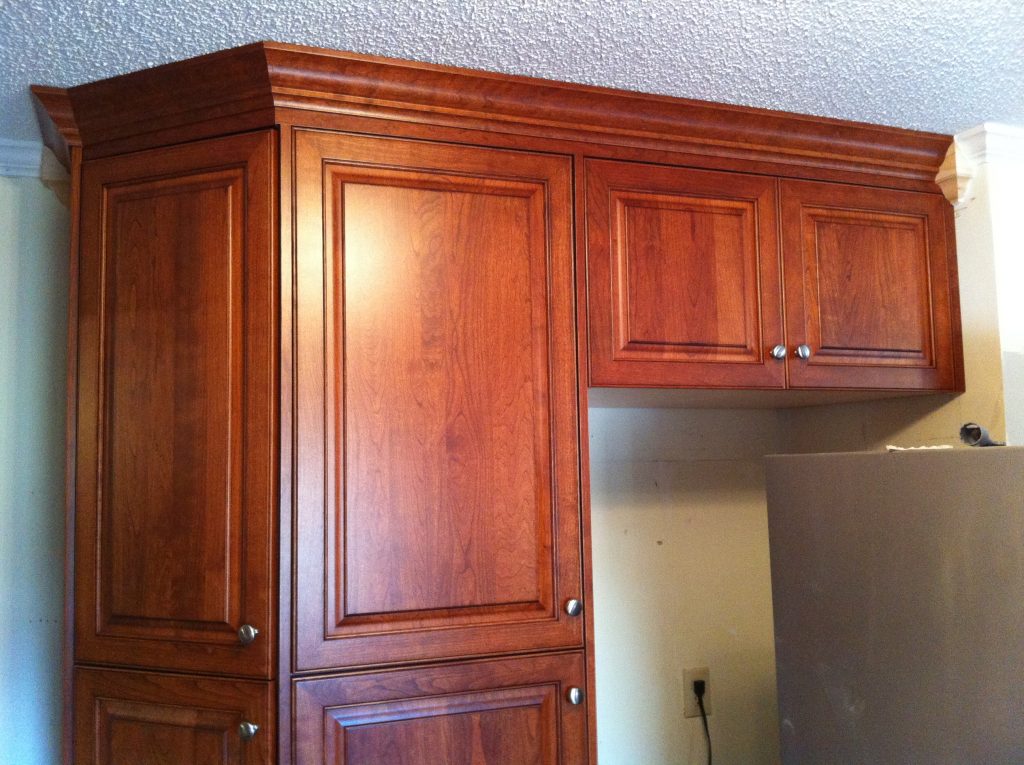
This second image is the cabinetry after the Frieze has been nailed onto the cabinets (the Crown Mold will cover the nails where the Frieze is nailed to the face of the cabinet).
And here is an image zoomed in a little closer to the Frieze, and also illustrating how I like applied ends in the middle of the run to butt the bottom of the Frieze (but, on the ends of the run, I like the applied end to go all the way to the top of the cabinet to receive the Frieze as illustrated at the far left side of the clipped tall cabinet in the image above).
This last photo shows the end result of using Frieze to accommodate face mount crown.
Well that pretty well covers this topic, but feel free to ask any questions you might have below, and to make sure you won’t miss any of our cabinotch® posts, enter your email address in the Subscribe field on the right, and each time we add to this discussion, you will automatically be notified. Oh, and you won’t hurt our feelings if, depending on where you are seeing this, you Share, Like, Plus or Re-tweet it.